It can be fairly common to have situations where your users need to quickly add items to a list, edit those items, and perhaps even sort them. Ideally, we can keep the user focused on their data and tasks rather than how to navigate the software facilitating the work.
The more we can keep the user from having to bounce around and make extra clicks, the more we can keep them focused on their work. The less they are being taken to different pages for different tasks like create or updates, before being redirected back, the calmer the interaction will be, and the more in tune with the overall task the user can be.
This particular UX is better suited for fine-grained, simple tasks. As each item to be created grows in complexity, the more we want to deliver to the user an opposite experience where they can go to a page dedicated to creation or updating free from distraction so they can focus time and effort on just that (e.g. writing a blog post). For now let's focus on the UX for small, simple, quick tasks (e.g. managing notes in a notebook).
Here is a quick sketch of what this UI looks like:
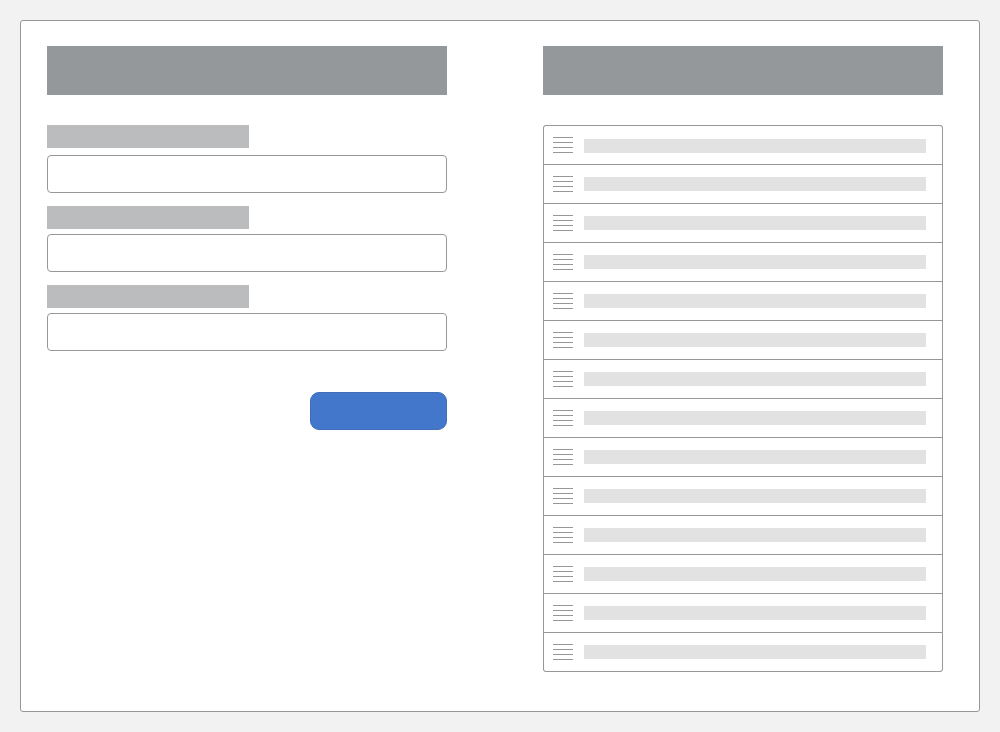
The UX works as follows:
- Fill out details in the form on the left to create a new item.
- After hitting submit, the item is added to the list on the right.
- Once added to list, you have a fresh form to add a new item.
- If you click an item in the list to the right, the form is loaded with data to edit.
- Upon saving your edits, the item in the list to the right is updated.
- After the update, the form is reset back to being ready to create a new item.
- You can drag/drop items in the list to change their sort order.
In order to make things smoother for the user we have to think about doing more within a single UI. This is going to require the use of some AJAX. And it's precisely for these situations that we've built eldarion-ajax.
While a rich frontend library like React or Vue could build this interface with ease, at times it can be overkill to build and maintain something with a heavy frontend.
I've prepared a demo project so you can see how all this can be coded up rather
simply with a handful of short views and a wee bit of javascript, leveraging
eldarion-ajax to handle most of the heavy lifting.
Let's walk through some of the highlights starting with an introduction to eldarion-ajax.
Ajax with HTML Markup
That's right. You can get a lot of Ajax functionality by just updating your markup and hooking up some views. No need to write javascript.
First off you'll want to include eldarion-ajax into your project either by
adding it in a <script> tag or with require('eldarion-ajax') in your bundle
after installing with npm install eldarion-ajax --save.
Once you have that, then it will look for <form> and <a> tags that have the
class ajax added to them. If you have a <form class="ajax"> or
<a href="" class="ajax"> then eldarion-ajax will hook into the submit or click
events and send requests to the server using jQuery's $.ajax method.
To control the behavior, you mark up your form or link with different data
tags. For example, if you want to instruct the link Ajax submission to use POST
instead of the default GET you would:
<a href="url to post to" class="ajax" data-method="post">Post to Server</a>Most of the directives are about what to do with the response from the server. They map pretty closely with the jQuery DOM manipulation commands.
For example:
<form id="my-form" method="post" action="url to post to" class="ajax" data-replace="#my-form">Would take the contents in the html node of the server response and replace
the <form> element.
You can read more about the options in the eldarion-ajax README.
The Demo App
The demo app is a contrived app designed to allow us to focus on the how rather than get caught up in the what.
Get started running locally:
pip install -r requirements.txt
npm install
./manage.py migrate
npm run dev
Now when you open http://localhost:3000 you can create a notebook and add, edit,
and sort notes in that notebook. There is no auth and this certainly isn't a
production app.
Templates
With eldarion-ajax we will be rendering small bits of HTML that we call
fragments in response to different Ajax calls. This allows us to leverage the
Django template langage. It also lets us reuse the fragments to render in full
pages as well as in returning updated fragments via Ajax.
By convention we name fragments with a leading underscore making it easy to see what's a fragment and what's a full page when viewing the code tree in our editors.
notes.html
This is the main interface and loads as an entire page from the server as a
DetailView for the Notebook object. The view, as we will see shortly, also
includes an ordered list of notes for the notebook.
We include the form fragment, _note_form.html and loop over any existing notes
and include a _note.html fragment for each note.
The data-save-order-url attribute is how we feed an end point to some of our
javascript so we can avoid hard coding urls. We will learn more about sorting
in just a bit.
{% extends "site_base.html" %}

{% block body %}
<div class="row notes-container">
    <div class="col notes-form-container">
        {% include "_note_form.html" %}
    </div>
    <div class="col notes-list-container">
        <h4>{{ notebook.name }} Notes</h4>
        <div id="note-list" data-save-order-url="{% url "ajax_notes_update_order" notebook.pk %}">
            {% for note in note_list %}
                {% include "_note.html" %}
            {% endfor %}
        </div>
    </div>
</div>
{% endblock %}
_note_form.html
The form will be used for both creates and updates. This is why we pass in the
post_url variable so that we can control where the form will post to depending
on the context of the render.
The data-replace value of #note-form means that eldarion-ajax will replace
the entire form with a new one that is the content we will render in the html
node of the JsonResponse. We'll see how that's done in the section below
where we cover the views.
{% load bootstrap %}
<form id="note-form" action="{{ post_url }}" method="post" class="ajax" data-replace="#note-form">
    {% csrf_token %}
    {{ form|bootstrap }}
    <div class="mt-5">
        <button class="btn btn-primary btn-block">
            {% if note %}Update{% else %}Create{% endif %}
            Note
        </button>
    </div>
</form>
_note.html
This fragment is pretty simple. It's just a link. We style this as a bootstrap
.list-group-item.list-group-item-action but that's really not critical for
what we are learning in this post.
The data-replace with a #note-form value will replace the form the same way
that the form's data-replace will replace itself. There is not data-method
because we want the default action of GET.
The data-id is the unique identifier for this note that is needed by
Sortable that we use for drag/drop sorting
and will discuss a bit later.
<a id="note-{{ note.pk }}"
    data-id="{{ note.pk }}"
    class="note ajax note-edit-link"
    data-replace="#note-form"
    href="{% url "ajax_notes_update" note.notebook.pk note.pk %}">
    <i class="handle"></i>
    {{ note.title }}
</a>
Views
NotebookNotesView
This is the top level view. It's a standard DetailView that loads up a Notebook
object based on the primary key in the URL. Nothing too special here. I will just
point out that the note_list is loaded from a custom property on Notebook
that returns a sorted list of notes. Also the post_url is initially set for
note creation.
class NotebookNotesView(DetailView):

    template_name = "notes.html"
    model = Notebook

    def get_context_data(self, **kwargs):
        context = super().get_context_data(**kwargs)
        context["note_list"] = self.object.notes
        context["form"] = NoteForm()
        context["post_url"] = reverse("ajax_notes_create", kwargs=dict(notebook_pk=self.object.pk))
        return context
ajax_notes_create
We either like to prefix our ajax views with ajax_ or put them in their own
ajax.py module. This is not required and is just convention. There is also
probably some DRYing up we could do between these views if we used class based
views with a mixin or two.
That said, this view should look pretty much like a standard form processing view where you check if the form is valid and do a save. The difference is in how we build up a response.
If the form is valid, we create a fresh instance of the form, otherwise we want
to use the form with the validation errors when we render the _note_form.html.
There are two things we are adding to the response:
The html node will be what the data-replace attribute uses to replace the
content found when taking its value and using as a DOM selector. In our case
it is always the #note-form form.
The other node, append-fragments is how we can send extra data to the browser
to update the UI as needed. In our case we want to add a new note link to the
#note-list container. eldarion-ajax takes items in append-fragments, finds
the DOM element with the selector found in the key, and then appends the string.
@require_POST
def ajax_notes_create(request, notebook_pk):
    notebook = get_object_or_404(Notebook, pk=notebook_pk)
    data = {}
    note = None
    form = NoteForm(request.POST)
    if form.is_valid():
        note = form.save(commit=False)
        note.notebook = notebook
        note.save()
        form = NoteForm()
        data["append-fragments"] = {
            "#note-list": render_to_string("_note.html", {"note": note})
        }
    data["html"] = render_to_string("_note_form.html", {
        "note": note,
        "form": form,
        "post_url": reverse("ajax_notes_create", kwargs=dict(notebook_pk=notebook_pk))
    }, request)
    return JsonResponse(data)
ajax_notes_update
Very similar to the create view, here we are handling both GET and POST. The
GET is called in response to the link being clicked. Once again we render the
the form, but this time we render the template with the context that includes
the note object we are updating as well as a post_url that points back to this
view to process the update.
Instead of using append-fragments in the processing of the POST after a
valid form, we use fragements. What this will do is replace the note in the
list identified with $('#note-PK') with the contents we render here.
def ajax_notes_update(request, notebook_pk, pk):
    notebook = get_object_or_404(Notebook, pk=notebook_pk)
    data = {}
    note = get_object_or_404(notebook.note_set, pk=pk)
    if request.method == "POST":
        form = NoteForm(request.POST, instance=note)
        post_url = reverse("ajax_notes_update", kwargs=dict(notebook_pk=notebook.pk, pk=pk))
        if form.is_valid():
            note = form.save()
            form = NoteForm()
            post_url = reverse("ajax_notes_create", kwargs=dict(notebook_pk=notebook.pk))
            data["fragments"] = {
                "#note-{}".format(note.pk): render_to_string("_note.html", {"note": note})
            }
    else:
        form = NoteForm(instance=note)
        post_url = reverse("ajax_notes_update", kwargs=dict(notebook_pk=notebook.pk, pk=pk))
    data["html"] = render_to_string("_note_form.html", {
        "note": note,
        "form": form,
        "post_url": post_url
    }, request)
    return JsonResponse(data)
ajax_notes_update_order
This view will handle the post back from Sortable that will be a string with
concanated PKs that are pulled from data-id in the links. We will see how this
data is used in just a bit. As you can see this is a very simple view that
doesn't really need much explanation.
@require_POST
def ajax_notes_update_order(request, notebook_pk):
    notebook = get_object_or_404(Notebook, pk=notebook_pk)
    notebook.note_order = request.POST.get("order")
    notebook.save()
    return JsonResponse({})
Javascript
While you don't need to write javascript to use Ajax with eldarion-ajax there
are a few important things to note and one reason we needed to add a bit of
custom javascript.
First of all, you need to read the CSRF token cookie and that's done with the
ajaxSendMethod. I won't go into that here other that know that this is where
we provide a function to the jQuery ajaxSend hook that will set the X-CSRFToken
header that Django needs to comply with CSRF verification. If you don't do this
you'll be stumped on why you are getting 403 Forbidden responses.
One of the reasons we are discussing javascript is I wanted to show you how to reload other javascript widgets that you might be using in your form. Here we have a date picker which is loaded on initial page load, but when you pump back content to the DOM, you need to reload the plugin otherwise you won't have the picker attached anymore.
We do this by hooking the eldarion-ajax:complete event that is sent after
every Ajax response is processed. The $el parameter that is passed to handlers
of this event is the object that originally had the the ajax class and was the
trigger of the Ajax request.
Since this event will fire for every request, we want to inspect the $el
object and see if we need to loadDatePicker or not. Also, while we were in
here, I thought it useful to trigger the active state on the list-group-item
so that it shows as selected while you are editing the note.
require('eldarion-ajax');
require('bootstrap-daterangepicker');

import moment from 'moment';

import ajaxSendMethod from './ajax';

const loadDatePicker = () => {
    $('#id_date').daterangepicker({
        singleDatePicker: true,
        startDate: $('#id_date').val() || moment(),
        locale: {
            format: 'YYYY-MM-DD'
        }
    });
};

$(() => {
    $(document).ajaxSend(ajaxSendMethod);

    loadDatePicker();
    $(document).on('eldarion-ajax:complete', (event, $el, responseData, textStatus, jqXHR) => {
        if ($el.attr('id') === 'note-form' || $el.hasClass('note-edit-link')) {
          loadDatePicker();
        }
        if ($el.hasClass('note-edit-link')) {
          $el.parent().find('.note').toggleClass('active', false);
          $el.toggleClass('active');
        }
    });
});
A Note on Ordering
The Sortable feature of this is not related to eldarion-ajax at all and
useful to discuss in its own context. We've seen the view that handles the
post back of ids.
That post back originates from this Javascript:
const $noteList = $('#note-list');
if ($noteList.length > 0) {
    const saveUrl = $noteList.data('save-order-url');
    Sortable.create($noteList[0], {
    store: {
        get: sortable => {
        return [];
        },
        set: sortable => {
        $.ajax({
            url: saveUrl,
            method: 'post',
            data: {
            order: sortable.toArray().join('|')
            }
        });
        }
    }
    });
}
We get the saveUrl from that data-save-order-url that we saw earlier when
discussing the templates. We take the ids found in data-id and passed to the
sortable object and concatenate to send as a string to the server which as
you saw previously we just store directly on the Notebook object.
We use that list of ids to instruct the order_by for the Notebook.notes
property that we send to the UI to preseve the ordering of your notes.
@property
def notes(self):
    order_by = "pk"
    if self.note_order:
        pks = self.note_order.split("|")
        order_by = models.Case(*[
            models.When(pk=pk, then=pos)
            for pos, pk in enumerate(pks)
        ])
    return self.note_set.all().order_by(order_by)
We use the models.Case and models.When clauses to build a SQL statement
that will order the results by the same order that we have the PKs for the note
objects stored in the note_order field.
Conclusion
Hopefully, we've provided a clear sense for how you can build a very useful
experience for your users without diving into rich frontend libraries. You might
eventually need to graduate up to React or Vue depending on how much more you
want to do, but when you have just a handful of activities like we have here we
find an eldarion-ajax to allow us to go from Idea to Lauch, Faster.
If you have an idea that you'd like help shipping, why don't you give us a shout. We'd love to talk with you about it.